Connect your strip in minutes
Pick the way that suits you, and we'll go through it with you step by step.
1×You do these steps just once, with each new strip. After that you control it from the app right away.
A new strip, or one that was reset?
From your phone
Fyshha app for Android (APK)
- The quickest way
- A small, temporary change in your router
From your computer
Fyshha program for Windows (EXE)
- No change to your router
- Best if you have an iPhone
My strip is already on Wi-Fi
Nothing to download
- The easiest way — just a small, temporary change in your router
- Best if you used to control it from another app
Connecting a strip that is already on Wi-Fi
- 1
Get what you need ready
⚠️ For safety: the first time you set up the strip, unplug any appliances from it. When it connects to Fyshha it will greet you with a few clicks 🙂 that's normal.- The strip is already working on your home Wi-Fi (as when you controlled it from another app).
- A phone or computer connected to your home Wi-Fi.
- About 10 minutes — that’s how long it takes.
Don't worry — we go through it with you step by step, and every step has a picture.
- 2
Find your router
The router is the box your internet company gave you (WE, Vodafone, Orange or Etisalat). It's usually a small white box with little blinking lights, and it's what gives you Wi-Fi. Find it in your home. - 3
Read the label on the back
Turn the router around and look at the back or the bottom. There's a sticker with your Wi-Fi name, your password and a username. Take a photo of it with your phone — we'll need it in a moment. - 4
Open the browser on your phone
The browser is the app you use to open websites (like Chrome). Tap its icon. Make sure your phone is connected to your home Wi-Fi. - 5
Type the router's address
Every router has its own address; the most common are 192.168.1.1, 192.168.0.1 and 192.168.100.1. Type one of them in the bar at the top (where you type website names) and press Enter. If no page opens, try the next one. The address is often printed on the sticker on the back of the router too. - 6
Sign in to the router
A page appears asking for a username and password. Type them exactly as on the sticker you photographed, and tap “Login”. If the sticker has no username, try admin in both boxes. - 7
Look for the word DNS
You're now inside the router's settings. Look through the menus (usually on the side) for the word DNS. It may be inside Internet, WAN, LAN or DHCP. Every router looks a little different, but the word is there. - 8
Type two numbers in the DNS boxes
You'll see two boxes. Type 130.110.101.114 in the first and 8.8.8.8 in the second. They're just two numbers — you'll put everything back the way it was in the last step. - 9
Tap Save
Tap “Save” (or “Apply”), then wait a minute. Your Wi-Fi might drop for a few seconds and come back by itself — that's normal. - 10
Unplug the strip and plug it back in
Pull the strip's plug from the wall, wait 5 seconds, and plug it back in. It will then look for Fyshha and connect by itself. - 11
Open the app and sign in
Open the control app (tap the button below) and sign in with your email and password. If you have no account, make one (just an email and a password).Open the app — tap here - 12
Find your strip
In the app tap “Add strip” and let it look for a strip in your home. Wait a minute until it appears, then tap it. The small yellow light turns off once it's connected. - 13
Put your router back
When your strip shows “Ready ✓” in “My strips”, open the router page again (like steps 4, 5 and 6), clear both DNS numbers (or choose “Automatic”) and tap “Save”. That's it — you're done! - 14
Now it's the app's turn: open it and take control
Your strip is ready! Open the app that controls your strip and try switching any outlet on and off.Open the app — tap here
Connecting from your phone (Android)
- 1
Get what you need ready
⚠️ For safety: the first time you set up the strip, unplug any appliances from it. When it connects to Fyshha it will greet you with a few clicks 🙂 that's normal.- The strip, plugged into the wall.
- An Android phone.
- Your home Wi-Fi name and password.
- About 10 minutes — that’s how long it takes.
Don't worry — we go through it with you step by step, and every step has a picture.
- 2
Find your router
The router is the box your internet company gave you (WE, Vodafone, Orange or Etisalat). It's usually a small white box with little blinking lights, and it's what gives you Wi-Fi. Find it in your home. - 3
Read the label on the back
Turn the router around and look at the back or the bottom. There's a sticker with your Wi-Fi name, your password and a username. Take a photo of it with your phone — we'll need it in a moment. - 4
Open the browser on your phone
The browser is the app you use to open websites (like Chrome). Tap its icon. Make sure your phone is connected to your home Wi-Fi. - 5
Type the router's address
Every router has its own address; the most common are 192.168.1.1, 192.168.0.1 and 192.168.100.1. Type one of them in the bar at the top (where you type website names) and press Enter. If no page opens, try the next one. The address is often printed on the sticker on the back of the router too. - 6
Sign in to the router
A page appears asking for a username and password. Type them exactly as on the sticker you photographed, and tap “Login”. If the sticker has no username, try admin in both boxes. - 7
Look for the word DNS
You're now inside the router's settings. Look through the menus (usually on the side) for the word DNS. It may be inside Internet, WAN, LAN or DHCP. Every router looks a little different, but the word is there. - 8
Type two numbers in the DNS boxes
You'll see two boxes. Type 130.110.101.114 in the first and 8.8.8.8 in the second. They're just two numbers — you'll put everything back the way it was in the last step. - 9
Tap Save
Tap “Save” (or “Apply”), then wait a minute. Your Wi-Fi might drop for a few seconds and come back by itself — that's normal. - 10
Get the Fyshha app
Tap the button below to download the app (APK), then open the file. If your phone asks about installing from outside the store, tap “Allow” (or “Settings”, then “Allow from this source”). Wait until it finishes installing.⬇ Download the app (APK) - 11
Open the app and sign in
Open the Fyshha app you just installed and type your Fyshha email and password. If you have no account, tap “I don't have an account”, make one (just an email and a password) and come back. When it asks whether you changed the router's DNS, tap the “Yes” button. - 12
Make the strip open its setup network
Press and hold the strip's big round button for 10 seconds, until the small yellow light keeps blinking fast. Then tap the “the light is blinking — continue” button. The strip creates a new Wi-Fi network — you'll see it in the next step. - 13
See the new network
Open the Wi-Fi settings on your phone (the same place where you pick your home Wi-Fi). In the list you'll see a new network called TONLY_TAP_xxxxxxx. Don't tap it yourself — the app connects to it by itself in the next step. If it doesn't show up, hold the strip's button for 10 seconds again. - 14
Pick your home Wi-Fi
The app finds the strip by itself. Pick your home Wi-Fi name (not the one ending in 5G), type the password exactly as on the sticker, and tap the start button. When Android asks, tap “Connect”, and keep the app open. - 15
Wait until it connects
The app says to wait until the strip connects. Don't unplug it yet! Wait until the small yellow light stops blinking and your phone makes a sound (a minute or two). - 16
Unplug it for 5 seconds, then plug it back in
When your phone makes a sound and says the strip is connected: unplug the strip, wait 5 seconds, and plug it back in. Then tap the “I unplugged it” button in the app. This step matters: it's how the strip gets the Fyshha software. - 17
Wait for “Done ✅”
Leave the strip plugged in and don't unplug it again, and keep the app open. Within 5 minutes the app says “Done ✅”. Don't put your router back before that. - 18
Put your router back
Once the app says “Done ✅”, open the router page again (like steps 4, 5 and 6), go back to the two DNS boxes, clear both numbers (or choose “Automatic”) and tap “Save”. The strip doesn't need them any more. That's it — you're done! - 19
Now it's the app's turn: open it and take control
Your strip is ready! Open the app that controls your strip and try switching any outlet on and off.Open the app — tap here
Connecting from your computer (Windows)
- 1
Get what you need ready
⚠️ For safety: the first time you set up the strip, unplug any appliances from it. When it connects to Fyshha it will greet you with a few clicks 🙂 that's normal.- A Windows 10 or 11 laptop.
- A network cable (Ethernet) — it looks like a wide phone cable.
- Your home Wi-Fi name and password.
- The strip, plugged into the wall.
- About 10 minutes — that’s how long it takes.
If your laptop has no socket for the cable, you'll need a small USB Wi-Fi adapter (they're cheap).
- 2
Plug the laptop into the router with the cable
Put one end of the cable in the laptop and the other end in any socket marked LAN on the back of the router. Why? So the laptop stays online through the cable and its Wi-Fi is free to talk to the strip. - 3
Get the Fyshha program and run it
Click the button below to download the program, then open it (double-click). If your browser says the file isn't commonly downloaded, choose “Keep”. If Windows shows a blue warning, click “More info” and then “Run anyway”, and if it asks whether to allow the program to make changes, click “Yes” — that's normal for any new program.⬇ Download the program (EXE) 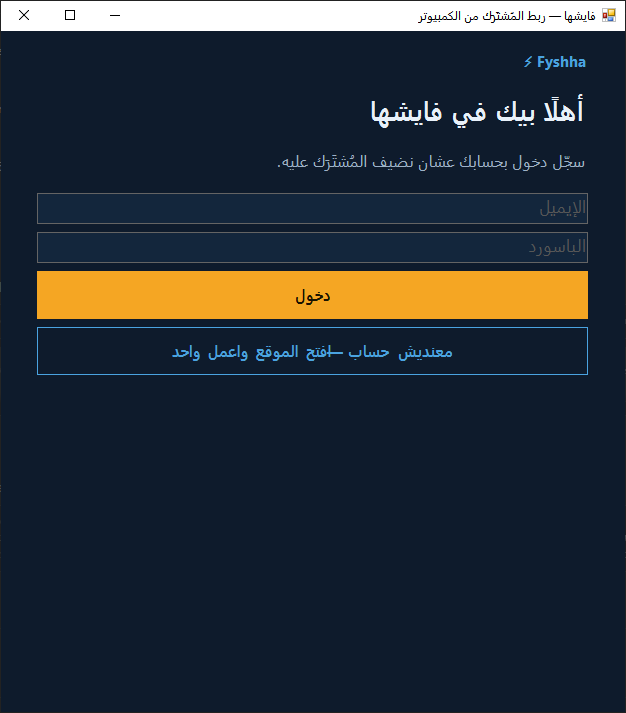 4
Sign in
Type your Fyshha email and password and click the sign-in button. If you have no account, click “I don't have an account” and make one (just an email and a password).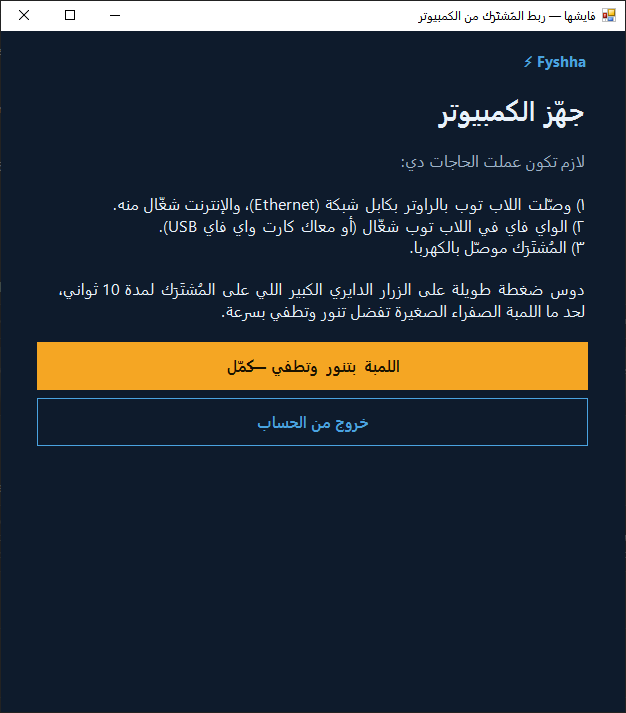 5
Check everything is ready
The program reminds you what must be ready: the cable plugged in, the laptop's Wi-Fi on, and the strip plugged in.- 6
Make the strip open its setup network
Press and hold the strip's big round button for 10 seconds, until the small yellow light keeps blinking fast. Then tap the “the light is blinking — continue” button. The strip creates a new Wi-Fi network — you'll see it in the next step. - 7
See the new network
Click the Wi-Fi icon next to the clock in Windows. In the list you'll see a new network called TONLY_TAP_xxxxxxx. Don't click it yourself — the program connects to it by itself. If it doesn't show up, hold the strip's button for 10 seconds again. 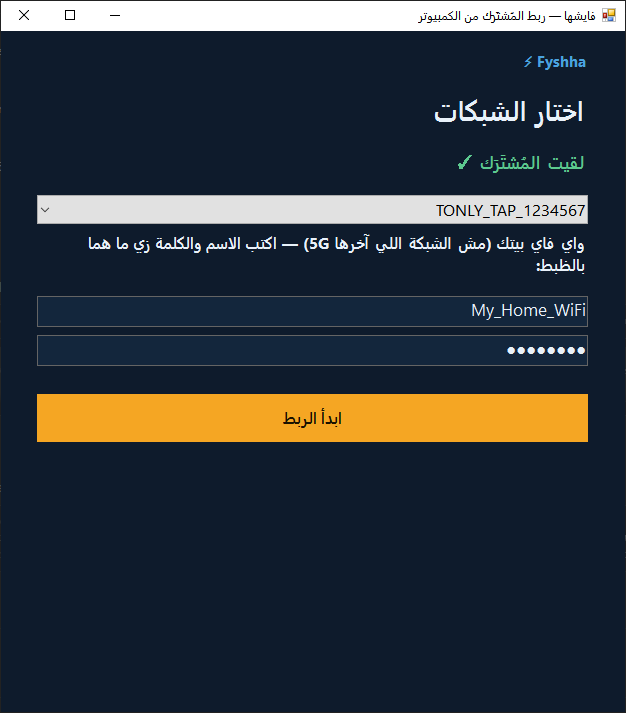 8
Enter your home Wi-Fi details
The program finds the strip by itself. Type your home Wi-Fi name and password exactly as on the sticker on the back of the router (not the network ending in 5G), then click the start button.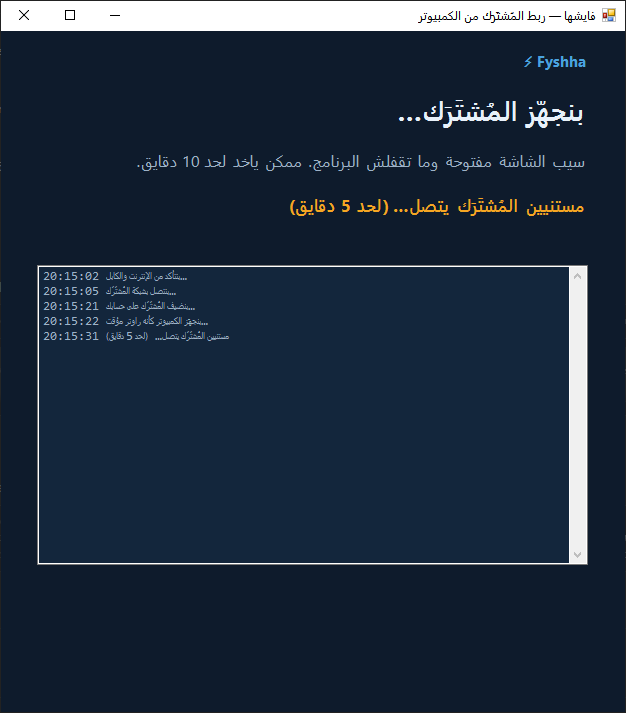 9
Let the program work
The program connects to the strip, sets it up and turns the computer into a temporary router. Keep the window open and don't close the program. Don't unplug the strip yet!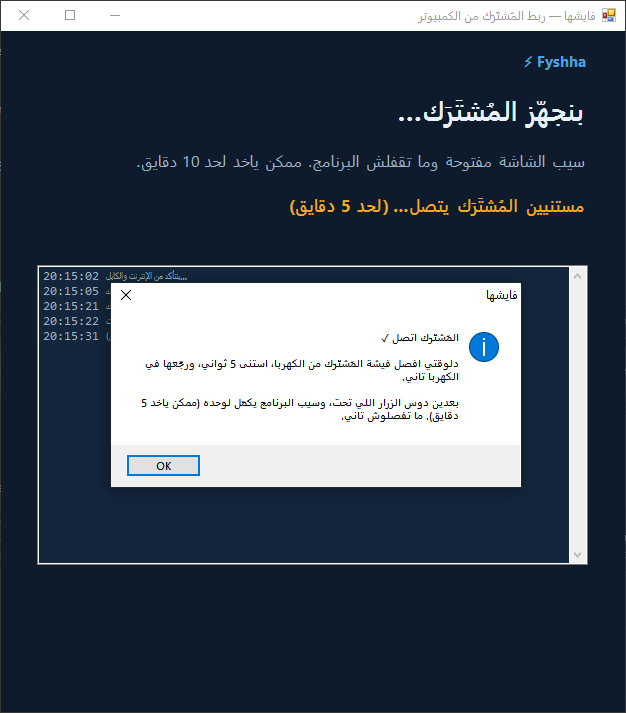 10
Unplug it for 5 seconds, then plug it back in
When you hear a sound and this message appears: unplug the strip, wait 5 seconds, and plug it back in. Then click “OK”. This step matters: it's how the strip gets the Fyshha software.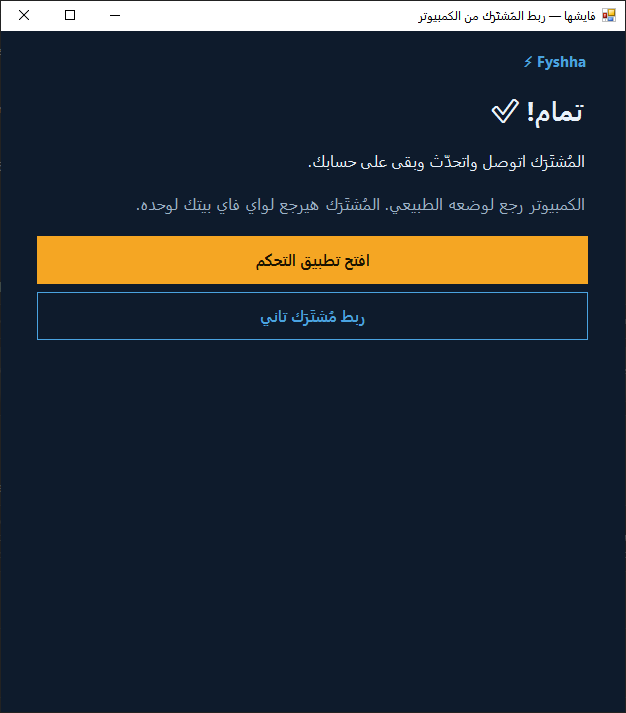 11
Wait for “Done ✅”
Leave the strip plugged in and don't unplug it again. Within 5–10 minutes the program says “Done ✅” and puts the computer back the way it was by itself. Then close it — the strip goes back to your home Wi-Fi by itself, and nothing was changed in your router.- 12
Now it's the app's turn: open it and take control
Your strip is ready! Open the app that controls your strip and try switching any outlet on and off.Open the app — tap here
Once connected, you control it from any phone — Android or iPhone — or any browser.